 Images play an important role in making webpages more appealing to visitors.
Chances are you spend a lot of time selecting the right images to enhance your blog posts, product pages, and so forth.
But do you spend an equal amount of time optimizing your images for search engines?
When it comes to image SEO, the most common tip you can find on the web is to fill in your alt text. That’s it. There seems to be nothing more to it.
I wish it was as simple as that!
If your website relies on visual content, then you need to spend some time optimizing the images on your site. Not only will it help you get more organic traffic, but it will also provide a better experience to your users.
Download Now: The Ultimate Guide to Link Building – 25 Actionable Strategies to Build High Quality Backlinks [Free eBook]
Improving the overall SEO of your images can result in a faster website, a richer user-experience, and even transform your articles from “good” to “great”.
In this article, we’ll reveal 7 image SEO tips that will help you get more organic traffic.
Table of Contents
7 Image SEO Tips to Grow Your Search Traffic
1. Include Descriptive Filenames for Images
With advances in Google’s machine learning capabilities, one may argue that it’s no longer necessary to use descriptive filenames for images.
That’s a good point. Just try Google’s Cloud Vision API, Google’s machine learning tool for image identification.
Select a few random images from the web, remove the descriptive text in the filenames, and then upload these images to see the accuracy with which Google predicts most images. But that’s the key here. Most images — not all images.
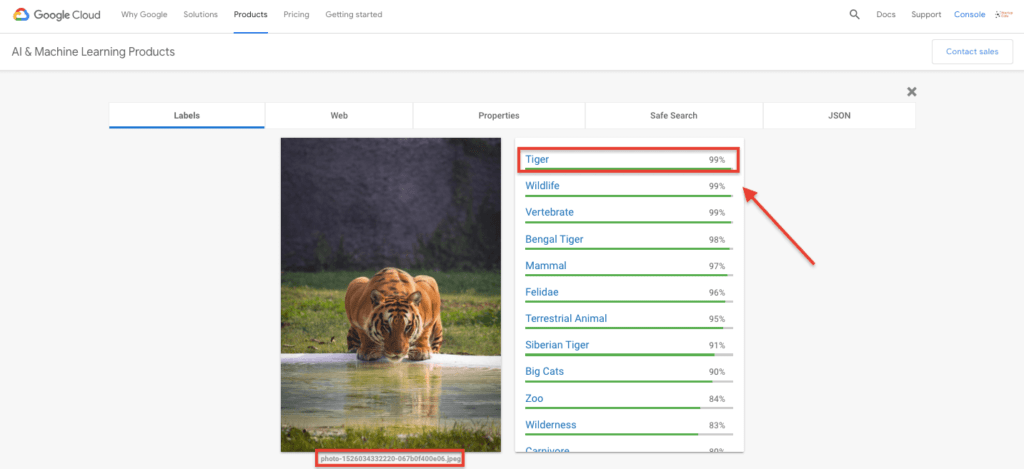
For instance, the Cloud Vision API can tell that the photo below is that of a tiger with a 99% accuracy:
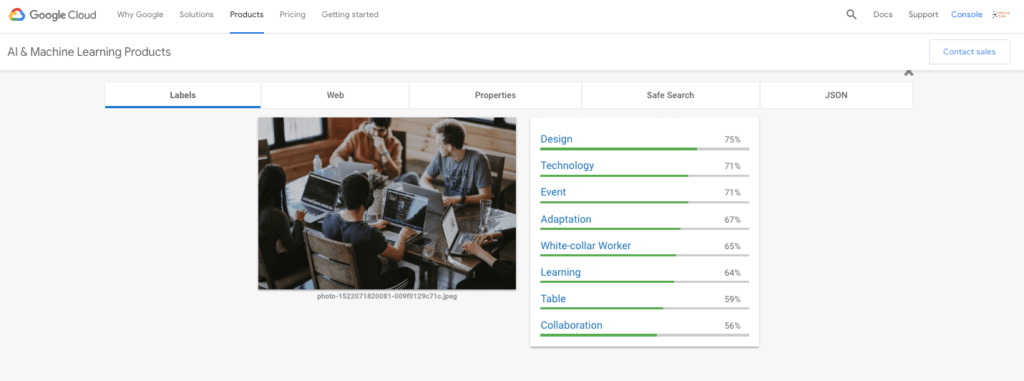
But when I uploaded a stock image that showcased teamwork at a startup, the results were mixed:
Don’t get me wrong. Google’s Cloud Vision API is an incredibly efficient tool and it just shows how much progress Google has made in the last decade on this front. But it’s not perfect.
So it’s up to us to do everything we can to make sure search engines understand the images we are uploading. And one way to do that is to use descriptive filenames for your images.
2. Choose the Best File Format
Page load time is a critical SEO factor both on desktop and mobile. And images often contribute the most to page load time.
According to Google:
Images are often the largest contributor to overall page size, which can make pages slow and expensive to load.
When you’re optimizing images for speed, you need to choose a format that offers the best compression and the least reduction in quality.
Most images on the web fall under two file types: JPEG and PNG. There are also other file formats like GIF and more recently, WebP, but these are not as widely used as the former two formats.
Both JPEG and PNG image format use different compression techniques and as such, file sizes between these two formats can be dramatically different.
As you can see above, the JPEG image is the clear winner. Both these images have been compressed, yet the JPEG has a much smaller file size. Furthermore, there’s very little difference between the quality of these images. Does that mean JPEG should be our preferred file format for all images? Not quite.
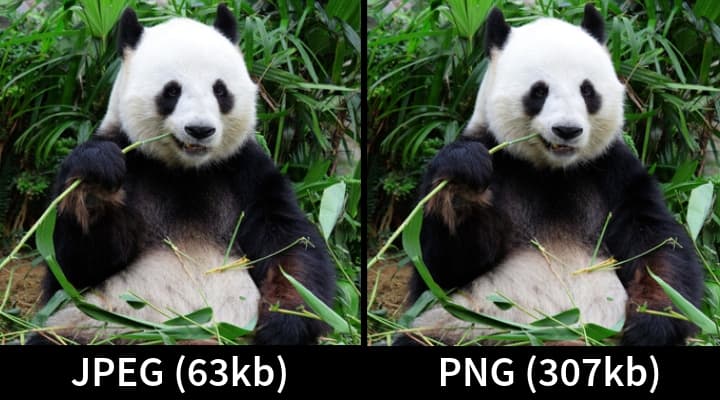
JPEGs are great for photographs, but whenever the images contain text, line drawings, etc. you should opt for PNGs. This illustration by Digital Inspiration provides the most compelling evidence of this:

If you use an online design tool like Canva, you can download your graphics in PNG or JPEG formats.
Just remember:
- For photographs, go with JPEG
- For images with text, go with PNG
If you’d like to convert an image from one format to the other, use these free tools:
Both these tools apply proper compression methods while converting your images from one format to the other.
Related: 19 Best SEO Plugins for WordPress
3. Compress Your Images
Now this is a really important step in optimizing your images for SEO. The larger your image file size, the longer it takes the web page to load.
Site speed is an important ranking factor, and as such, we need to do our best in optimizing the speed and performance of our website.
Large image file sizes are among the chief causes of speed issues. Luckily, there are several free tools on the web that can help you compress the file size of your images.
Regardless of the image format you choose, you can decrease the file size of images without compromising on the quality.
With that in mind, here is the same image in JPEG format but with two different file sizes:
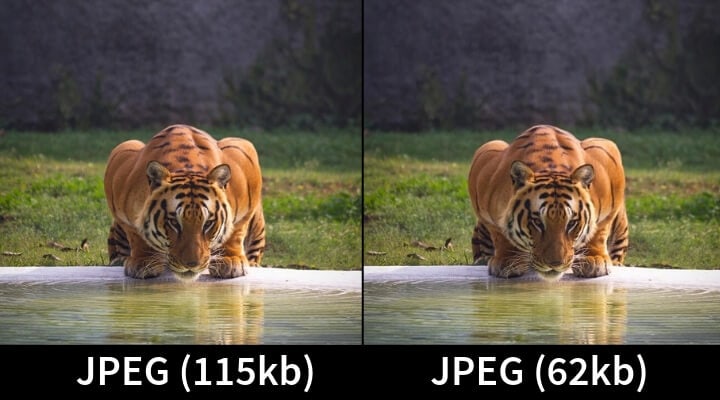
The second image is much smaller, but there’s little difference in terms of quality of these images.
On Google’s Web Developer Blog, the company emphasizes the importance of optimizing images for the web:
Images often account for most of the downloaded bytes on a web page and also often occupy a significant amount of visual space. As a result, optimizing images can often yield some of the largest byte savings and performance improvements for your website.
To that end, here’s the advice Google gives on image compression:
For best results, experiment with various quality settings for your images, and don’t be afraid to dial down the quality – the visual results are often very good and the filesize savings can be quite large.
Now that you know the importance of image compressions, let’s take a look at some of the best image compression tools that can help you achieve this task with ease.
- TinyPNG: This is the tool I’d highly recommend for compressing images in PNG format. TinyPNG uses smart lossy compression techniques to reduce the file size of your PNG files. But how about JPEG files? TinyPNG is not the most efficient in that regard. For compressing JPEG files, I’d recommend the next tool.
- ImageOptim: If you’re a Mac user, then this is a must-have tool for image compression. This is the tool recommended by Google as well. ImageOptim is by far the best tool for compressing JPEGs, but not for PNGs. For compressing PNGs, you’re better off using TinyPNG.
- ShortPixel: If you run your website on WordPress, then you can download the ShortPixel WordPress plugin. The free plan allows you to compress 100 images per month.
4. Provide Alt Text for Images
Alt text (alternative text), also known as alt attributes, is used to describe an image. Adding alt text to images improves web accessibility and helps browsers better understand the images on your site. Browsers display alt text if there’s a problem loading the images.
Despite advances in Google’s abilities to understand images, adding alt text to images is still an important on-page SEO factor.
Here’s Google’s advice on how to effectively write an alt text:
When choosing alt text, focus on creating useful, information-rich content that uses keywords appropriately and is in context of the content of the page. Avoid filling alt attributes with keywords (keyword stuffing) as it results in a negative user experience and may cause your site to be seen as spam.
Google Image Best Practices also provides the following examples to compare bad alt attributes from the good ones.
- Bad (missing alt text): <img src=”puppy.jpg” alt=””/>
- Bad (keyword stuffing): <img src=”puppy.jpg” alt=”puppy dog baby dog pup pups puppies doggies pups litter puppies dog retriever labrador wolfhound setter pointer puppy jack russell terrier puppies dog food cheap dogfood puppy food”/>
- Better: <img src=”puppy.jpg” alt=”puppy”/>
- Best: <img src=”puppy.jpg” alt=”Dalmatian puppy playing fetch”/>
Always aim at describing the images as best as you can. Be concise and avoid keyword stuffing.
5. Lazy-Load Your Images
Lazy loading is a technique that defers the loading of non-critical resources (images, videos, etc.) at page load time. Instead, these non-critical resources are loaded only when your visitors need them.
Here’s how Google explains the benefit of lazy loading:
When we lazy load images and video, we reduce initial page load time, initial page weight, and system resource usage, all of which have positive impacts on performance.
An example of lazy loading can be found on Google’s Web Fundamentals which uses the publishing platform Medium to show image lazy loading in action.

As you can see above, a placeholder image is shown at page load (left), and when scrolled into the viewport, the full image loads when it’s needed.
If you’re a WordPress user, you can lazy load your images by using the free a3 Lazy Load plugin. This is the plugin I’m currently using on my blog to lazy load the images.
6. Enable Browser Caching
Browser caching can help speed up your site by storing some of the larger files on your site (including images) locally in the user’s web browser.
Every time a browser loads a webpage, it has to download all the web files to properly display the webpage, including all the HTML, JavaScript, CSS, and images.
Some pages might contain a few files and be small in size, while others may consist of many files and be large in size. These larger files can take a long time to load and each file makes a separate request to the server, further reducing the page speed.
This is where browser caching can help as some of these larger files are stored in your visitors’ browsers. Ideally, you’d want to keep them there as this ensures your site loads much faster. But you wouldn’t want to keep them there forever as you’ll be updating your website on a frequent basis. Google recommends a minimum cache time of one week and preferably up to one year for static assets, or assets that change infrequently.
Here’s how Google explains the importance of HTTP caching:
Fetching something over the network is both slow and expensive. Large responses require many roundtrips between the client and server, which delays when they are available and when the browser can process them, and also incurs data costs for the visitor. As a result, the ability to cache and reuse previously fetched resources is a critical aspect of optimizing for performance.
Here’s a helpful decision tree from Google which will help you determine the optimal caching policy for a particular resource, or a set of resources, that your site uses.

If you’re a WordPress user, the solution is quite simple. Download any of these free caching plugins below and enable browser caching in the settings:
I’m currently using WP Fastest Cache for all my sites and I’m really happy with the results.
7. Resize Your Images
Page load time is an important SEO component. Images can have a significant impact on how fast or slow a web page loads.
Here’s how resizing images to your site dimensions can help improve site performance:
Let’s say the maximum width of your content area is 600px and you’re uploading an image that is 5000px wide. The browser will resize the image to make it fit on the screen. However, the browser still has to load the entire image size. This can really affect your site speed.
Therefore, when adding images, it’s best they are never displayed wider than your site dimensions.
The solution is to resize your images in line with your site dimensions. Here’s how you can go about this process:
- Find the width of the content area on your site using the Chrome browser. Right click anywhere inside your content area and select ‘Inspect’.
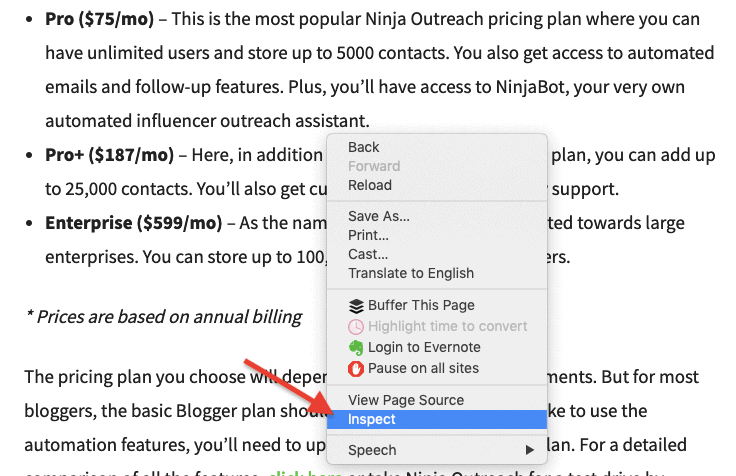
- In the new window that appears on the side of your browser, move your cursor within the code until you see the content area highlighted.
- Check the tooltip at the top of the content area that’s highlighted. The first number is the width.

- Use the free SmartResize tool to resize your images. This tool also allows you to upload your images in bulk while keeping your file names intact.
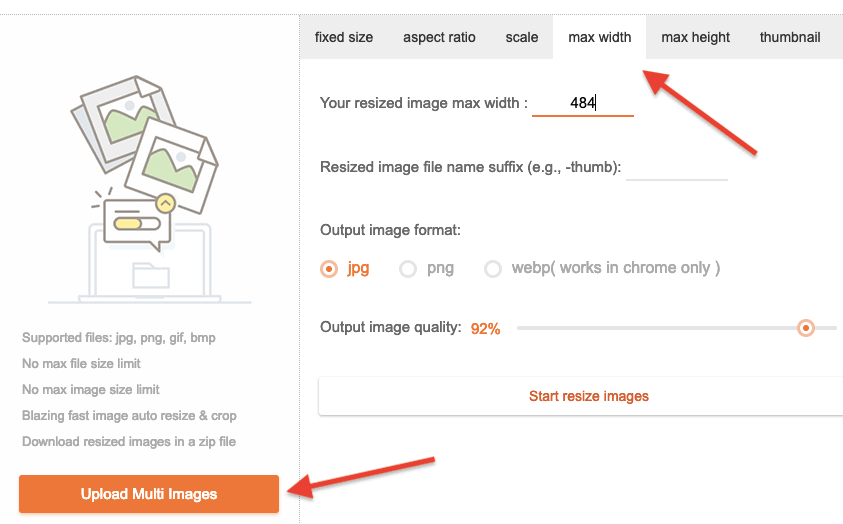 It’s only the width that matters, so bulk upload your images, select the ‘max width’ option, enter your content width, and start resizing your images.
Final Thoughts
Google’s machine learning capabilities are evolving day by day. A day may come when you no longer need to consider image SEO. But until that day arrives, we need to optimize the images as best as we can to help them stand out in search engine results.
Keep these 7 optimization tips in mind next time you’re uploading images to your site. At the same time, remember that the images you use should enhance the user experience of visitors on your site and complement the text to make it more visually appealing. To that end, choose only high-quality stock photos and improve your design skills to create aesthetically pleasing graphics.
If you liked this article, please share it on Twitter using the link below:
Editor’s Note: This article was first published on March 10, 2019 and has been updated regularly since then for relevance and comprehensiveness.
Related Articles
The first tip(Google Cloud Vision) are awesome. Thanks!
One small detail: PNG images, unless they are small logos, are very big compared to their JPEG version.
What I usually do is to convert PNG images, pictures to JPEG and have the JPEGs optimized.
I usually let ShortPixel do this automatically.
[…] “seo tips” – Google News […]
Excellent article with great points. Thanks Sandeep for your tips. Everyone want’s organic traffic at any cost. By adding only ALT tag to the image is not the good way to optimize images.
Image file name, format, size description should be appropriated and rationalized. I always write same file name and ALT text tag. Henceforth, I write proper description pertaining that image.
I use smush plugin to reduce size. Though, there are many ways available. Definitely, People should put extra care about image optimizations process to drive more traffic.
Thanks
–Taposh
A well explained simple article
[…] 1. Image SEO: 7 Actionable Tips to Supercharge Your Organic Traffic [99signals] […]
GZip compression is also very imporant. Has a big impact on page load.
Excellent article with great points especially information about google cloud version and which image format should we use with a different scenario
Hi Sandeep,
I’ve always go with PNG files for all my images and then compress it to reduce its size. Thanks for the extra information
Absolutely, image optimization is one of the factors to boost SEO by improving loading speed and user experience. Keep sharing more posts like this!
Absolutely gem of an article… I realised the importance of image compression now.
Excellent article with great points especially information about google cloud version and which image format should we use with a different scenario