One of the most powerful aspects of marketing on Facebook is the sheer volume of behavioral data that the Facebook ads manager collects and how well you can use that data to target customers with ads.
However, all this data cannot be properly collected without the Facebook pixel.
The pixel collects behavioral data from websites outside of Facebook and sends it back to the ads manager, so the Facebook algorithm can use that data for ad targeting and audience building.
Using the pixel can be intimidating, especially if you have no coding experience. But, Facebook has gone to great lengths to make installing the pixel as easy as possible. So, you can implement the pixel, even if you have no coding knowledge.
We’ll cover how to add the Facebook pixel to your website and other online assets. But first, let’s talk about what exactly the Facebook pixel does for you and why you need it.
Table of Contents
The ‘What’ and ‘Why’ of the Facebook Pixel
The Facebook pixel’s name is more descriptive than you might think.
It’s called the “pixel” because Facebook found that the best way to collect user data was to use a 1×1 image on websites, with a bit of Javascript code that triggered whenever that image loaded for a website visitor. Since the image is only a single pixel, people don’t see it on their screens. So, the data collection process is entirely transparent to the end user.
Each time the Facebook pixel is loaded on a website, the bit of Javascript behind the pixel fires off a packet of data to the Facebook Ads Manager.
The pixel data packet contains whatever behavioral and demographic data can be gathered from the user’s connection. This includes things like the webpage that the user came from, geographic location, and how long they stayed on that particular page.
This data is valuable to marketers for two reasons:
- It enables them to measure the ROI of their Facebook campaign by tracking traffic and conversions that come from their Facebook ads.
- It gives the Facebook Ads Manager the data it needs to build custom audiences based on who’s visiting your site and who’s converting.
You can think of the Facebook pixel as the Facebook equivalent of Google Analytics. Using the Facebook pixel is key to maximizing the performance of your Facebook ad campaigns.
What Can You Do with the Facebook Pixel?
The Facebook pixel enables you to do some very important things with your Facebook ad campaigns:
- Track conversions.
- Measure conversion values.
- Create custom and lookalike audiences.
- Run retargeting campaigns.
Here’s how each of these activities works.
Tracking Conversions with the Facebook Pixel
Image Source: Driftrock
If you’re running conversion or consideration campaigns where you want to track conversions or page views, you’ll need the pixel installed on the pages where you’re tracking those actions.
Tracking conversion actions and landing page views not only enables you to assess your campaigns, it also enables the Facebook algorithm to adjust the ad targeting and show ads to people who are most likely to convert.
So, the Facebook pixel grants clarity in your campaign analytics, and helps Facebook automatically improve your ad performance.
Related: 25+ Places You Should Be Sharing Your Content
Measuring Conversion Values
In addition to tracking the number of conversions, the Facebook pixel can be set up with a standard event (more on standard events later on) that collect data on how much each conversion is worth.
For example, when you’re measuring conversions and conversion values, you’d get data from your website that shows you have 15 conversions for the week. Then, the conversion value data shows you that each of these conversions was a $500 purchase, totalling $7,500 in revenue.
As you already know, measuring conversion values is critical for calculating your ROI.
Creating Custom and Lookalike Audiences
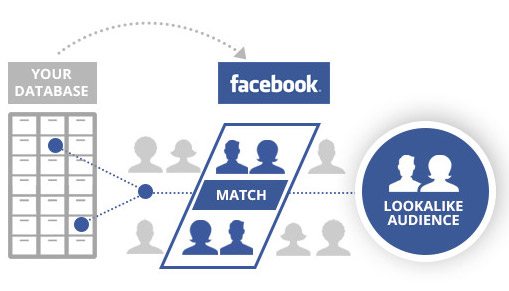
Image Source: Instapage
When a person visits your website or makes a purchase after clicking on one of your Facebook ads, that person’s behavioral and demographic data get recorded in the Facebook Ads Manager.
This enables you to create audiences solely composed of people who have visited your website, made a purchase, or even added items to their cart, but failed to complete the purchase.
Then, Facebook can create lookalike audiences from these custom audiences. A lookalike audience is made up of all the Facebook users whose behavioral and demographic markers closely match the behavioral and demographic data of the people who have previously visited your site or made a purchase.
Lookalike audiences enable you to target new prospects who are most likely to become customers with fresh ads.
Using Retargeting Campaigns to Capture More Purchases

Image Source: MarTech Today
So, what about those custom audiences we just talked about? You use them for retargeting ads.
You can create ads specifically for people who visited your site but didn’t convert. Or those who loaded up their cart but didn’t buy. And people who have already made a purchase.
Then you use the custom audiences to ensure that those ads are only shown to the people they’re intended for. It’s a great way to encourage people to take the next step toward a purchase, recapture purchases from cart abandoners, and offer upsells and addons to those who have already made a purchase.
These capabilities make your Facebook marketing far more effective. But, you can’t do it without the Facebook pixel.
Now, let’s talk about how to install your pixel.
How to Install Your Facebook Pixel
Each Facebook pixel is unique. When you create a pixel in the Facebook Ads Manager, it creates a unique snippet of code and a pixel ID number that identifies the pixel, so it doesn’t get mixed up with other pixels.
To create your first pixel, click on the menu button in the upper left hand corner of the Facebook Business Manager, and select “pixels” from the dropdown menu.
This will start the pixel creation wizard.
First, you’ll get a dialogue to name your pixel and enter the URL where the pixel will be installed.
Once you’ve named your pixel and added a target URL, Facebook will auto generate a snippet of code for your pixel.
At this point, there are three ways to install your pixel on your website:
- Install the pixel yourself (easy and free).
- Email the snippet of code to a developer with instructions (easier, most likely not free).
- Connect your Facebook ad account to the Google Tag Manager, if you use the tag manager on your website (easy and adds no additional cost).
We’ll talk about installing the pixel yourself, since the other two methods are nearly hands-free for you.
Image Source: Themeisle
If you use a web hosting service with a website builder like Wix, Squarespace, Weebly, or Bluehost, there’s a field where you simply copy and paste your Facebook pixel code snippet.
For example, this is what the Facebook pixel installation looks like on Wix:
You’ll simply copy and paste the pixel ID from the Facebook Ads Manager here, and Wix does the rest. The same goes for most-drag-and-drop website editors. The hardest part is finding the pixel integration option in the menu.
If you’re using a more development intensive web hosting platform, like WordPress, you may have to copy the code snippet itself, and add it to the page header manually. Again, you’re still just copying and pasting. There’s no need to write any code.
Image Source: Themeisle
Once you’ve got your code installed on your website, you’ll need to create some events, so the Facebook Ads Manager knows what information it’s looking for.
Facebook pixel events fall into two broad categories:
- Standard events.
- Custom events.
Both have their uses, which we’ll have a look at now.
Facebook Pixel Events
Events are how you specify which actions the Facebook pixel is tracking on each page.
Here again, if you’re using a hosting service with a drag-and-drop editor (Wix, Squarespace, etc.), you most likely won’t need to add any code yourself to set up standard events.
If you need to set up custom events, you may want to work with a developer to ensure they’re implemented correctly.
Here’s how each of these events works.
Standard Facebook Events
Facebook has the most common actions prestaged in the pixel manager.
Wix, Squarespace, and similar web hosting platforms will auto configure the pixel based on how you’ve set up the pixel in the Facebook Ads Manager. You won’t have to manage any code yourself.
If your web hosting service doesn’t manage the pixel for you, you’ll need to cut and paste a single line of code into the center of your pixel snippet. The Facebook help center lists the bit of code associated with each event, and shows where to copy and paste it.
Image Source: Facebook Business Help Center
If muddling around in the code on your site is a bit too much for your coding skills, you can consult a developer to help you. They’ll be able to get things set up very quickly.
Custom Facebook Events
Custom events are for when you need the Facebook pixel to track something other than a standard event. With custom events, you can get much more granular about the information you track with the Facebook pixel.
Additionally, custom events share much less data with Facebook. So, if information privacy is a big concern for you, custom events may be the way to go.
However, you’ll need to work with a developer to set up custom events. Custom events need to be added to your website on a page-by-page basis, and you need custom code to ensure that the pixel is pulling the information you want.
If you need custom events, but have no developer to work with, you can use the Google Tag Manager. The tag manager will walk you through the process of setting up custom events.
Once you’ve got your events set up, use the Facebook Pixel Helper Chrome Extension to check your site and ensure your Facebook pixel is working correctly.
If everything is green, you’ll be all set to start getting the most out of your Facebook ad campaigns.
Final Standard Event
Once you’ve got your Facebook pixel installed and get your events set up, using the pixel is very easy. It’s all controlled through the Facebook Ads Manager interface. It’s simple point-and-click operation.
Here are a few key takeaways to get you on the path to success:
- Stick to using standard events if you can. As long as each page on your website only has a single purpose, standard events will do everything you need. They’re also the easiest to set up and offer the most insight into your ad performance.
- Use the Facebook pixel to build audiences of your most engaged customers and those who are most likely to convert. This makes your ad targeting much more precise, and therefore improves your ad performance.
- Capitalize on the power of remarketing. People who have already expressed interest are far more likely to convert than cold prospects. So, use the Facebook pixel tracking to identify those who have interacted with your ads, visited your website, or abandoned their carts, and serve them ads to keep them moving toward that purchase.
That does it for our coverage of the Facebook pixel.
If you’d like a more in-depth look at what the pixel can do, or if you want to become a Facebook video marketing expert, check out the Biteable Facebook Video Marketing Lab.
If you found this article useful, please share it on Twitter using the link below:
Editor’s Note: This article was first published on 21 July 2019 and has been updated regularly since then for relevance, freshness, and comprehensiveness.
Related Articles