![How to Track Facebook Ads in Google Analytics [Video + Article]](https://99signals.com/wp-content/uploads/2019/12/Facebook-Ads-in-Google-Analytics_99signals.png "How to Track Facebook Ads in Google Analytics [Video + Article]")
Do you use Facebook ads to drive traffic to your website? Then you’d probably know you can’t always rely on Facebook Insights to provide you with accurate data.
This is where you need Google Analytics, which provides a more accurate picture of traffic stats from Facebook ads. However, there are a few steps involved before Google Analytics can arm you with this data.
In this article, I’ll reveal how you can start tracking Facebook ads more effectively in Google Analytics.
Note: If you prefer to watch the video guide, you can watch the video below. Scroll down if you prefer to read the article.
Why Use Google Analytics to Track Facebook Ads
Let’s get this out of the way first.
You may be thinking why it’s necessary for us to track Facebook ads in Google Analytics when we have Facebook Insights.
While it’s true Facebook Insights contains a pool of useful data, there’s a certain amount of discrepancy between the traffic data you get in Facebook Insights and the data in Google Analytics. Since Google Analytics tracks your overall website traffic (organic, direct, social, and referral), you’d want the information presented here to be as accurate as rest of the traffic data.
This discrepancy in traffic data can be avoided by using URL parameters.
URL parameters are used to track information about a click.
URL parameters comprise of a key and a value separated by an equals sign (=) and joined by an ampersand (&). The first parameter always comes after a question mark in a URL as shown in the example below:

Image Source: Search Engine Journal
In addition to presenting you with accurate information on clicks, URL parameters also help you differentiate between the traffic you get from Facebook organic (your Facebook posts) and Facebook ads.
By using URL parameters, you’ll know exactly which ad campaign, which ad set is driving traffic to your website, and you can also track conversions on your website that way.
Tracking Facebook Ads in Google Analytics: Step-by-step Guide
Now that we have established the need for using Google Analytics to track Facebook ads and the importance of URL parameters, it’s time to initiate the whole setup. Just follow these 5 simple steps to track your Facebook ads in Google Analytics:
- Use URL Campaign Builder to Generate URL Parameters
- Define Your Campaign Source, Medium, and Name
- Define Campaign Term and Campaign Content
- Generate a New Campaign URL for Your Ad
- Track Performance in Google Analytics
Step 1 – Use URL Campaign Builder to Generate URL Parameters
The first step is to generate URL parameters for your Facebook ad campaign. To generate URL parameters, you can use a free tool by Google called Campaign URL Builder.

Fill out the required fields in the Campaign URL Builder form. Once this form is complete, there will be a campaign URL generated with all the URL parameters. You can use this newly-generated URL in your Facebook ads and start tracking traffic in Google Analytics.
To begin with, just go to the page/post that you wish to promote on Facebook.
Copy the URL and paste it in the website URL box.

Step 2 – Define Your Campaign Source, Medium, and Name
The next field is Campaign Source. You can either mention “Facebook ad” as the campaign source or you can just mention “Facebook.”
In order to differentiate between the traffic from Facebook organic posts and traffic from Facebook ads, I recommend you mention “Facebook ad” here.
Next, mention “CPC” as your campaign medium if you’re tracking link clicks or “CPM” if you’re tracking impressions.
If you’re not sure, just login to Facebook and navigate to Ads Manager —> Ad Set —> Budget & Schedule —> Optimization & Delivery and check out the option you’ve selected in Optimization for Ad Delivery.
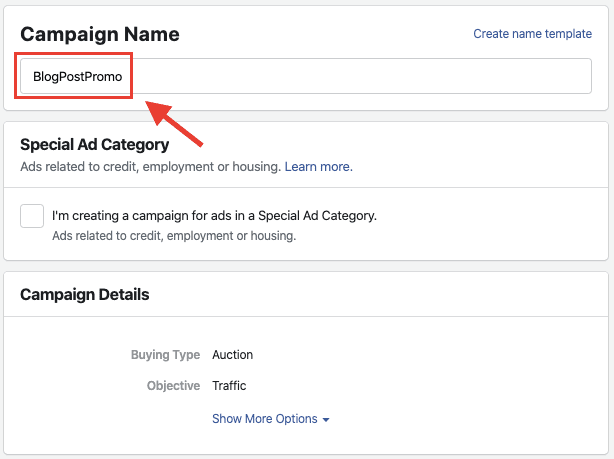
Next, enter the Campaign Name. It should be the same as the name of your Facebook ad campaign in Facebook Ads Manager as shown above.
After these four fields have been filled, this is what your Campaign Builder form should look like:

Step 3 – Define Campaign Term and Campaign Content
You’ll notice that the first four fields in the form are mandatory and the rest are not. Nevertheless, I recommend that you fill in the rest of the information as well because you’ll most likely be running multiple campaigns on Facebook and you’d want to track each campaign individually in your Google Analytics report.
The more specific you get with your URL parameters, the better it will be, and you’ll know exactly which campaign is driving traffic to your site and which campaign needs to be improved.
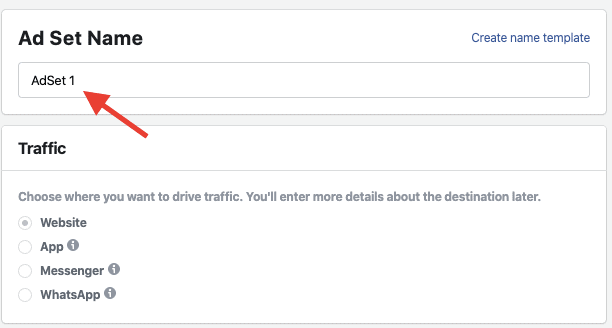
The Campaign Term should be the same as the name of your Ad Set. Copy the name in your Ad Set and paste it in the Campaign Term box.
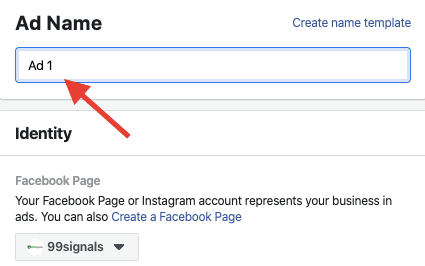
Similarly, your Campaign Content should be the same as the name of your Ad on Facebook. Just copy the same name and paste it into the box.
When all the fields are filled, your Campaign URL Builder form should like this:
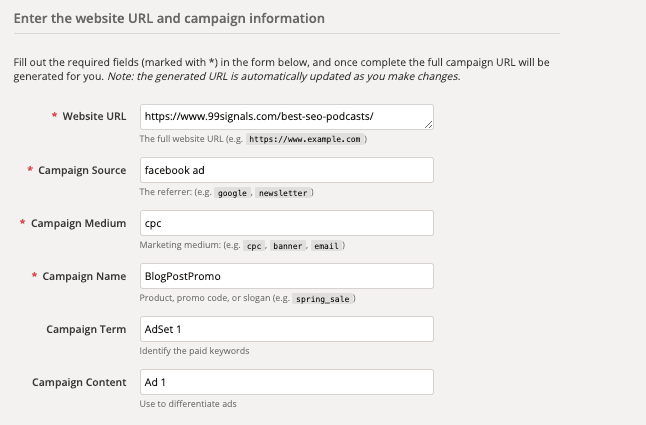
In the example above, I’ve used generic terms to define Campaign Term and Campaign Content. You can be more specific with the terms you’re using to define your parameters, especially in the case of Campaign Content.
In case you’re using different ad formats (image, video, carousel, etc.) under an Ad Set to promote the same post, you can use the Campaign Content field to differentiate these ads. Just remember that you need to generate a different campaign URL for each ad to track them accurately in Google Analytics.
Related: The Ultimate Guide to Facebook Messenger Ads
Step 4 – Generate a New Campaign URL for Your Ad
Now that your form is filled, your campaign URL would have been auto-generated. Just scroll down to see your generated campaign URL.

In order to start tracking Facebook ads in Google Analytics, you’ll need to copy the portion of the URL starting after the question mark.
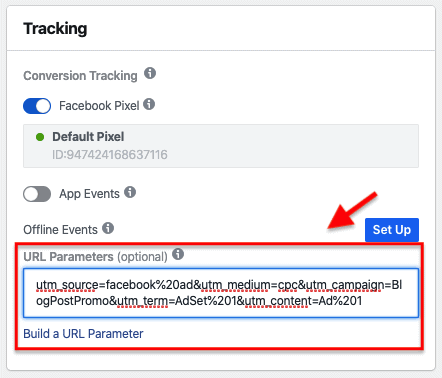
On Facebook, navigate to Ads Manager —> Ad Set —> Ad —> URL Parameters. Paste your campaign URL parameters in this box as shown below:
Another option is to copy the whole URL and paste it into the Website URL field.
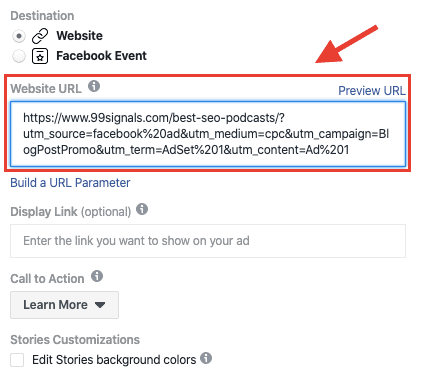
Make sure you preview your new URL to check if the URL parameters are visible on the new URL opened in a new tab.
Yet another option is to convert the generated URL into a short link. You can connect your Bit.ly account with Campaign URL Builder and get additional insights for your ad campaign via Bit.ly.
Once you’ve previewed the new campaign URL, hit the “Publish” button.
You’re all set to track the performance of your Facebook ads in Google Analytics.
Step 5 – Track performance in Google Analytics
To start tracking Facebook ads in Google Analytics, login to your Google Analytics account. From the left side menu, navigate to Acquisition —> All Traffic —> Source/Medium.
From Primary Dimension, navigate to the Other dropdown menu, and select the parameter you want to track from the Acquisition dimensions.
From this report, you can gauge your Facebook ad campaign performance. If you followed all the steps outlined here, you’ll find traffic data for your Facebook ad campaigns under “Campaign” — the campaign name will be the same as the one you entered in the Campaign Name field in Campaign URL Builder.
Similarly, you can see how your ad sets have performance when you select “Keyword” (Campaign Term) and track your individual ad performance under “Ad Content” (Campaign Content).
Summary
Getting an accurate picture of your ad performance on Facebook will not just help you see how your Facebook ads are performing, but will also help you make tweaks and adjustments to increase the reach and effectiveness of your ads.
Start tracking your Facebook ads in Google Analytics by following the steps outlined in this article and optimize your campaigns on Facebook.
Hope you found this article useful. You can watch this accompanying tutorial video to help set up URL parameters for your Facebook ad campaigns.
If you liked this article, please share it on Twitter using the link below:
Editor’s Note: This article was first published on December 25, 2019 and has been updated regularly since then for relevance and comprehensiveness.
Related Articles
- The Ultimate Guide to Facebook Messenger Ads
- 27 Best Facebook Marketing Tools to Level Up Your Campaigns
- Facebook Ads Quiz: 15 Questions to Test Your Facebook Marketing Expertise
- 25+ Places You Should Be Sharing Your Content
- Facebook Pixel: A Quick Guide to Installing and Using Facebook’s All-Purpose Tracking Tool
Analytics are only effective if you can adequately track all traffic sources.
Exactly what I was looking for. Thank you!